
How to Propagate Succulents from Leaves: Step by Step
Leaf propagation is the cheapest way to turn one succulent into a whole tray of babies. It’s simple — but a few small mistakes (a torn leaf, watering too early, burying the base) quietly kill most attempts. Here’s the exact method, plus the two things the guides get contradictory about.
First: Will Your Succulent Grow from a Leaf?
Leaf propagation only works on plump, fleshy-leaved types. Trying it on the wrong plant is the #1 reason beginners “fail” — the leaf was never going to root. Check before you start.
| Works well from leaves | Won't work — use another method |
|---|---|
| Echeveria | Aeonium → stem cuttings only |
| Sedum (incl. Burro's Tail) | Aloe → offsets (pups) |
| Graptopetalum / Graptoveria | Haworthia → offsets |
| Pachyphytum | Gasteria → offsets |
| Jade (Crassula ovata) | Sempervivum → offsets |
If yours is in the right column, see the other propagation methods instead.
What You'll Need
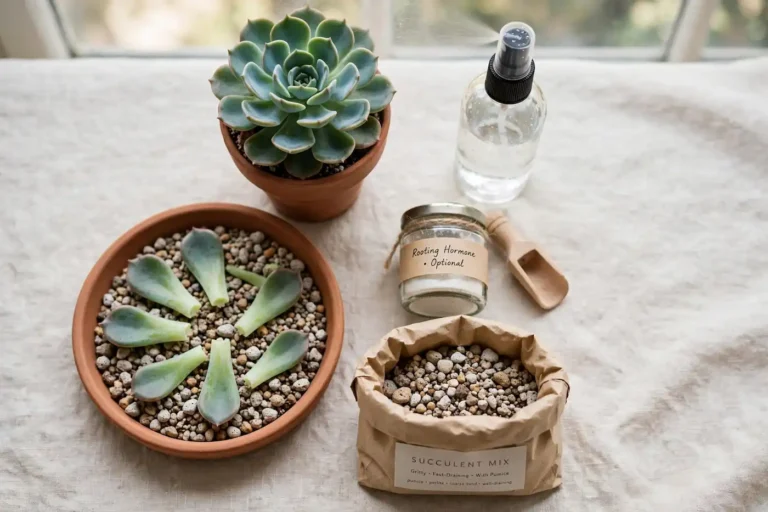
- A healthy parent succulent from the left-hand list above
- 5–10 leaves (not all will root — that's normal)
- A shallow tray or dish
- Gritty, fast-draining succulent mix
- A spray bottle
- Bright, indirect light
- Optional: rooting hormone to speed things up
No gritty mix on hand? Make a batch with the DIY succulent soil recipe.
Step-by-Step: Leaf Propagation
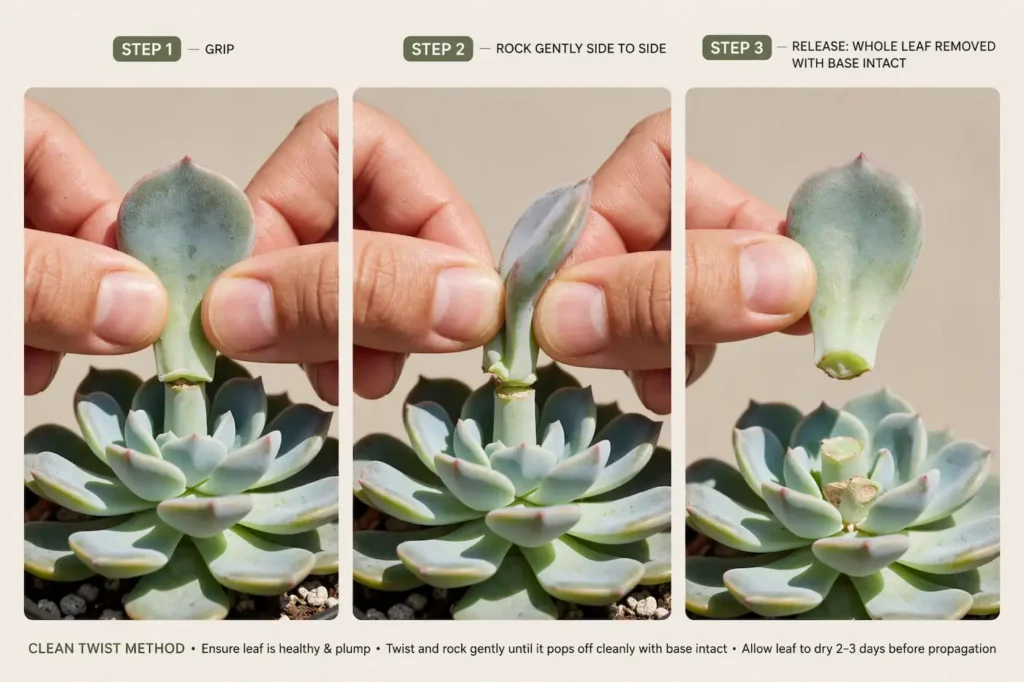
- Pick healthy leaves. Plump, firm, unblemished ones from the middle or lower stem. Skip anything yellow, mushy or shrivelled.
- Remove with a clean twist. Grip the leaf and gently rock it side to side until it pops off whole, with the base intact. A torn or partial leaf will not root — this is the single most important move.
- Let them callus. Lay the leaves in a dry, shaded, airy spot for 2–4 days until the cut end scabs over. Do not skip this.
- Lay them on top of the soil. Set the callused leaves flat on gritty mix — do not bury the base (see why below).
- Give bright, indirect light. Enough light to trigger growth, but out of harsh direct sun that would fry the tiny leaves.
- Mist, don’t soak. Lightly spray the soil surface only when it’s fully dry — roughly every few days. The leaf feeds the baby; too much water rots it.
- Wait and watch. Pink roots appear in a few weeks, then a tiny rosette. Once roots show, you can nudge them toward the soil.
- Transplant when ready. When the parent leaf shrivels and falls off and the baby has its own roots, pot it up in its own gritty mix.
Good Leaf vs. Bad Leaf
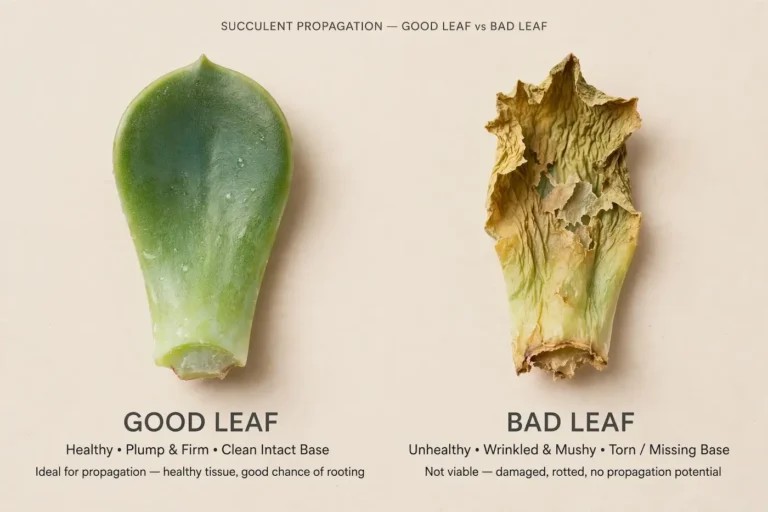
Success starts before the leaf ever touches soil. This is what separates a leaf that roots from one that just rots away.
| A leaf that will root | A leaf that won't |
|---|---|
| Whole, with a clean intact base | Torn, ripped, or missing its base |
| Plump and firm | Thin, wrinkled or floppy |
| Healthy green (or normal colour) | Yellow, brown, translucent or mushy |
| Twisted off cleanly | Cut with scissors mid-leaf |
| From a healthy mature plant | From a stressed or diseased plant |
Lay on Top or Bury the Base? Settling the Debate
You’ll see both online, which causes a lot of failed props. Here’s the resolution: lay the leaf flat on top of the soil — do not bury the cut end. The callused base is a healed wound; pushing it into moist soil re-exposes it to constant moisture and it rots before roots form.
The nuance behind the “bury” advice: once new roots have emerged, those fine roots do want to reach soil. At that point, gently rest them on the surface or dust a little mix over the roots only — never over the leaf’s base. Roots seek moisture down; the leaf stays dry on top. That’s the whole trick.
How Long It Takes
| Stage | When | What you'll see |
|---|---|---|
| Callus | Days 2–4 | Dry, scabbed base |
| First roots | Weeks 2–4 | Fine pink roots at the base |
| Baby rosette | Weeks 4–8 | A miniature plant forming |
| Parent leaf shrivels | Weeks 8–12 | Original leaf dries and drops — this means success |
| Ready to pot | 3+ months | Independent baby with its own roots |
Expect only about half your leaves to make it — that’s why you start with 5–10. Winter propagation runs slower; a grow light and gentle warmth help.
Why Your Leaves Aren't Rooting
- The leaf was torn or partial — start over with a clean twist
- You skipped callusing and the base rotted
- You buried the base instead of laying it on top
- Overwatering — the leaf turns translucent and mushy
- Too little light — roots and rosette never form
- Not enough time — shrivelled parent leaf is normal, not failure
Full diagnosis for each failure mode: why your succulent propagation isn’t rooting.
Do You Need Rooting Hormone?
No — most fleshy-leaved succulents root fine without it. But a light dip of the callused base in rooting hormone can speed things up and give more uniform roots, which is handy for slower types or winter propagation. It’s an optional accelerator, not a requirement.
Leaf Propagation FAQ
Lay them flat on top. Burying the callused base traps moisture against the wound and causes rot. Only once roots emerge should you guide the roots (not the leaf) toward the soil.
Roots appear in 2–4 weeks and a baby rosette in 4–8 weeks, but a fully independent plant takes 3 months or more. Be patient.
Some shrivelling of the parent leaf is normal — it’s feeding the baby. But early shrivelling with no roots usually means too little moisture or light, or the leaf was damaged.
Lightly mist the soil only when it’s completely dry, roughly every few days. The leaf supplies most of the moisture; overwatering is the main killer.
No. Only fleshy-leaved types like Echeveria, Sedum, Graptopetalum and Jade. Aeoniums need cuttings; Aloe, Haworthia and Sempervivum propagate from offsets.
Explore the Other Methods
Leaves are just one route. Cuttings and offsets are faster — see how they compare.
Part of the Succulent Care hub